Gleeca Restaurant Onboarding Checklist
Thank you for choosing Gleeca. Here is the Restaurant Onboarding Checklist which could help you configure your Gleeca account faster as per your restaurant business model.
Step 1: Sign up for an Account
Setting up the Gleeca Account is very simple.
Step 1.1: Fill out the Instant Sign-up Form
First, you must use your personal information such as Name, Email Address and Mobile Number to complete the signup process.

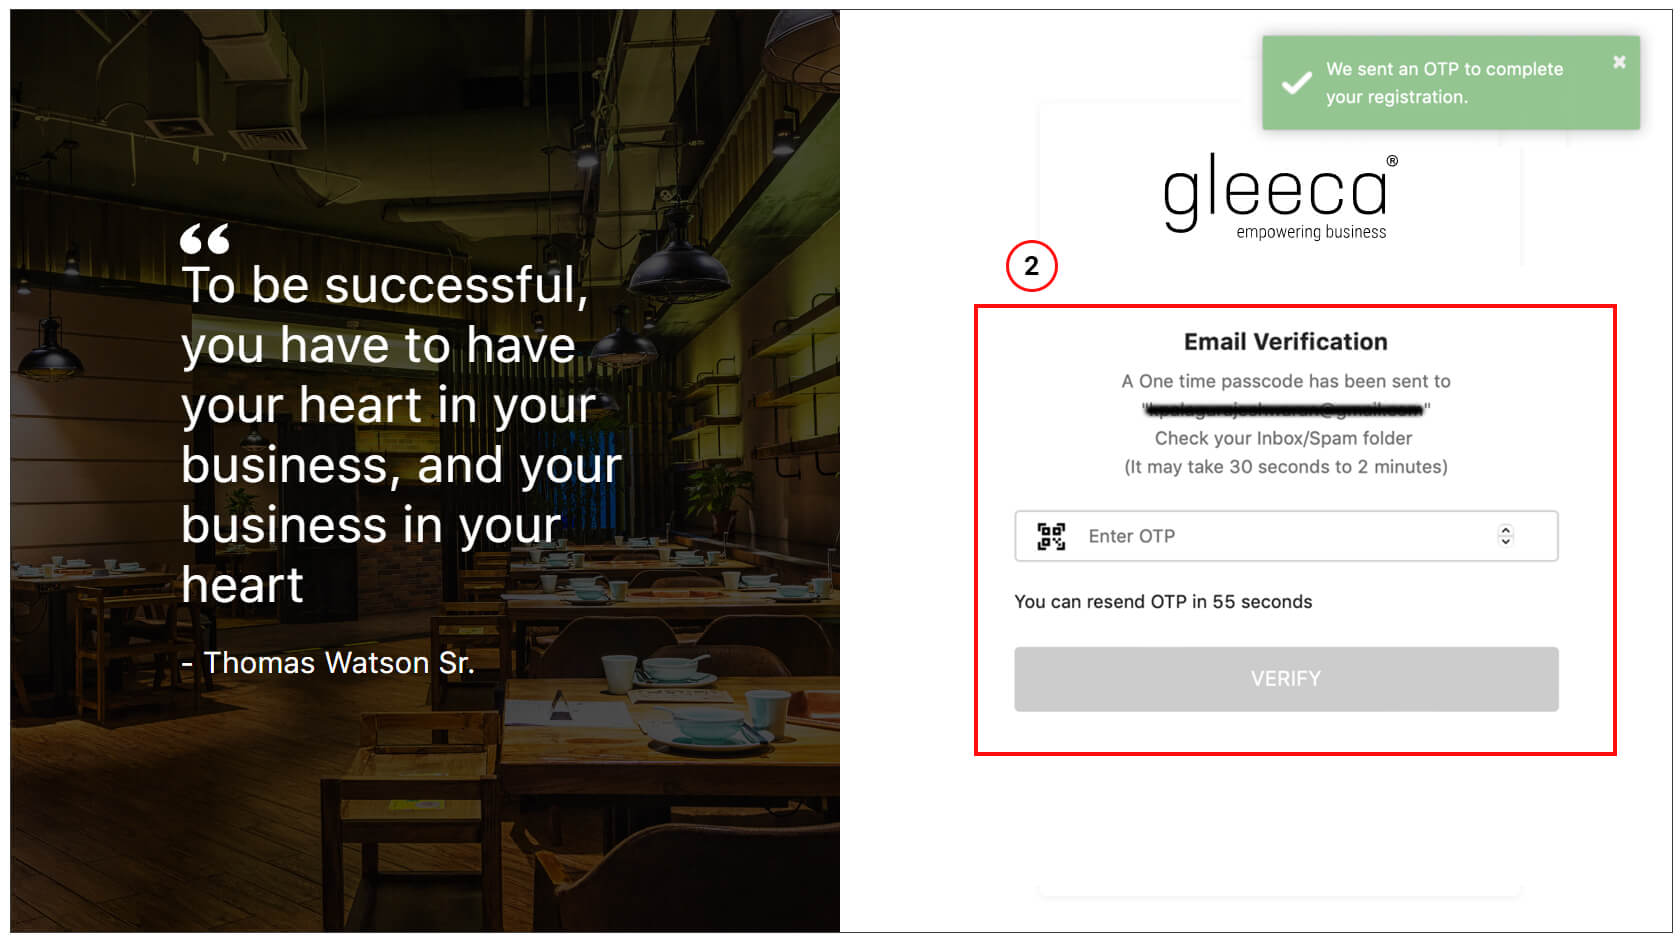
Step 1.2: Verify Your Email Address
Please check your inbox or spam folder and enter the OTP.
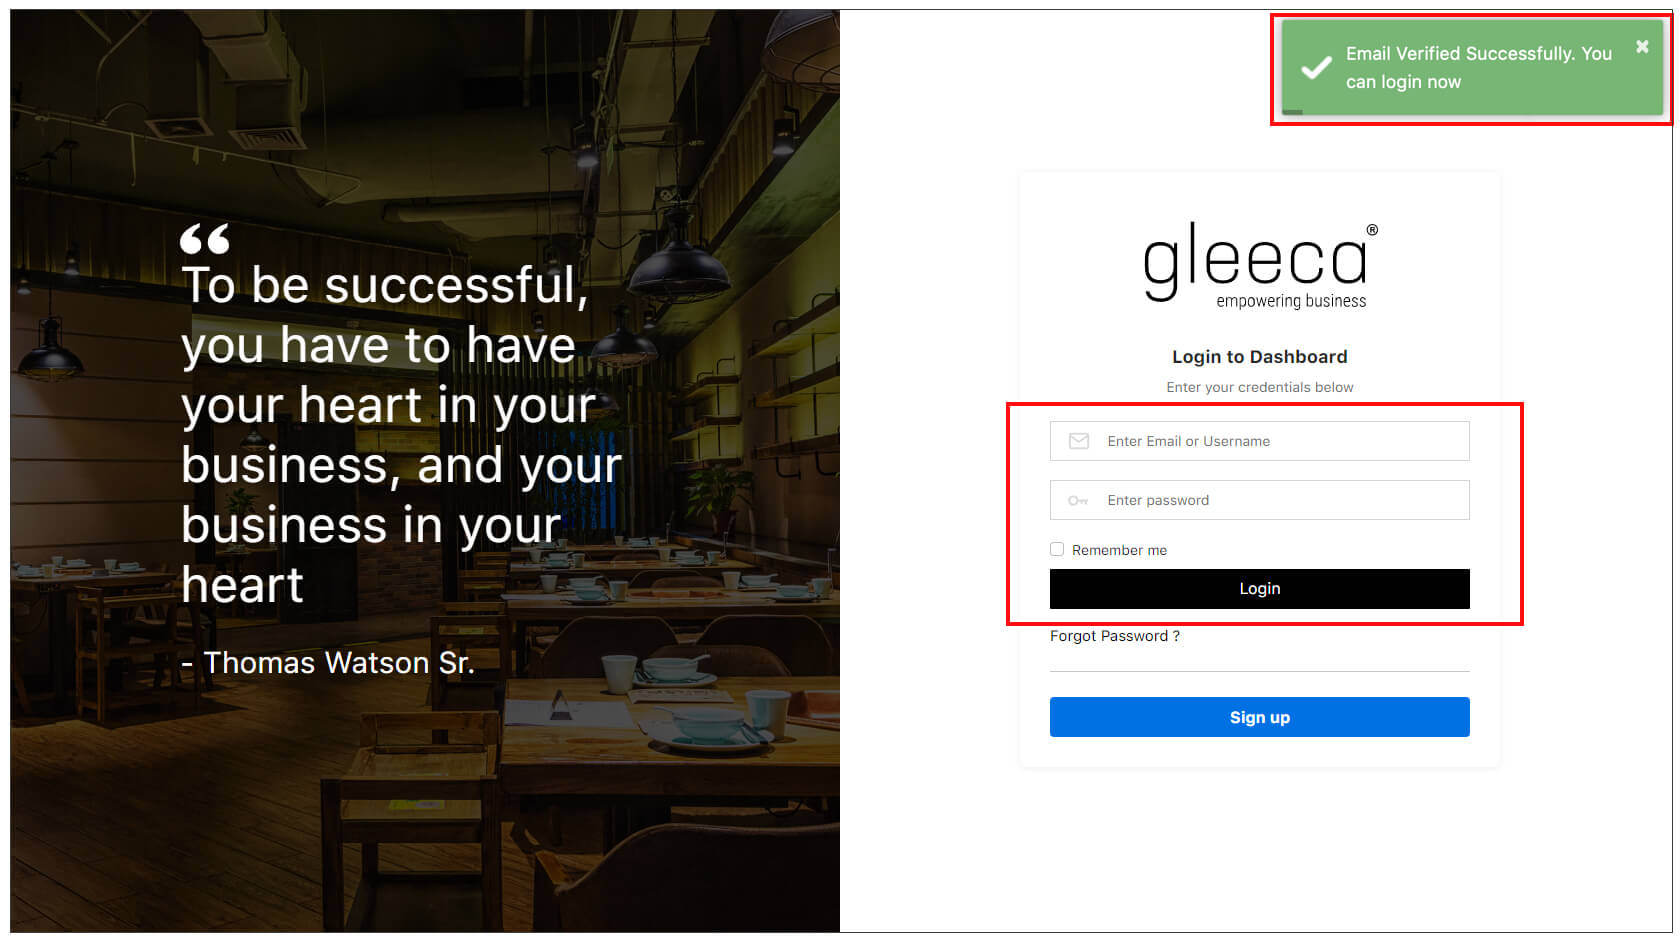
Step 1.3: Login Again
Once you enter the OTP, you will get a success message, and you have to log in again to complete the two simple steps.
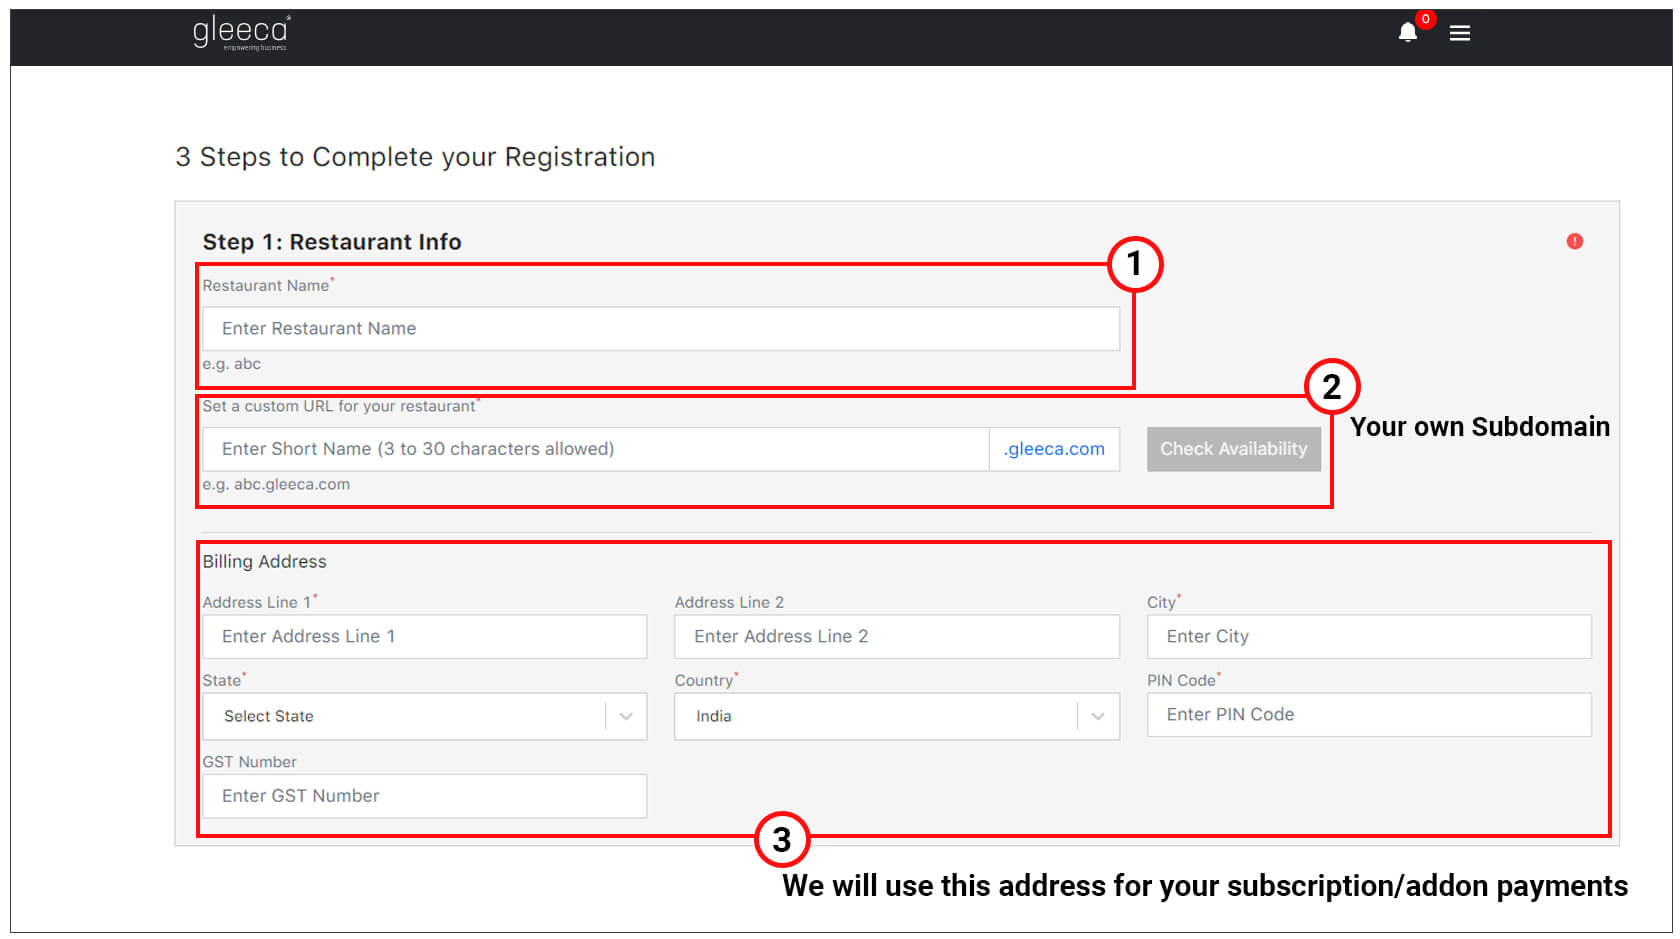
Step 1.4: Complete the Two Steps to Confirm Your Free Subscription
In Step 1, enter more about your Restaurant & Block your Custom URL
In Step 2, verify your mobile

For more information, please visit How to set up Gleeca?
Step 2: Creating Your First Branch for Free
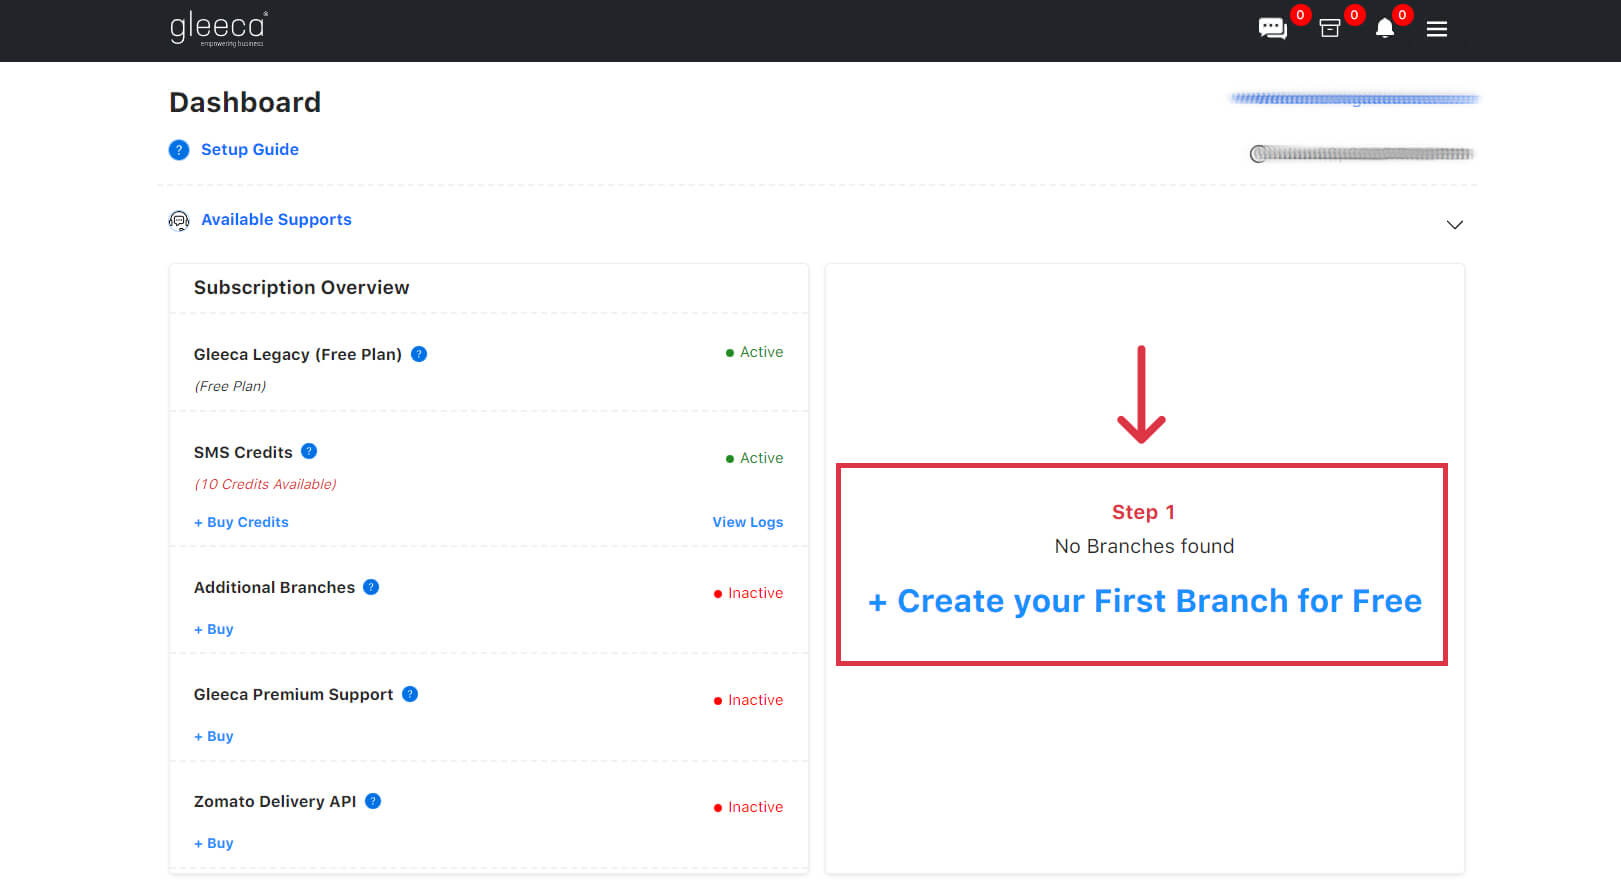
After you follow the above steps, you will be redirected to your dashboard. Now it’s time to create your first free restaurant branch and configure your business model, like the type of food served at your restaurant (e.g., Veg/Non-Veg) and the type of restaurant (cuisine). Click the “Create Your First Branch for Free” link.
Step 2.1: Branch Basic Information
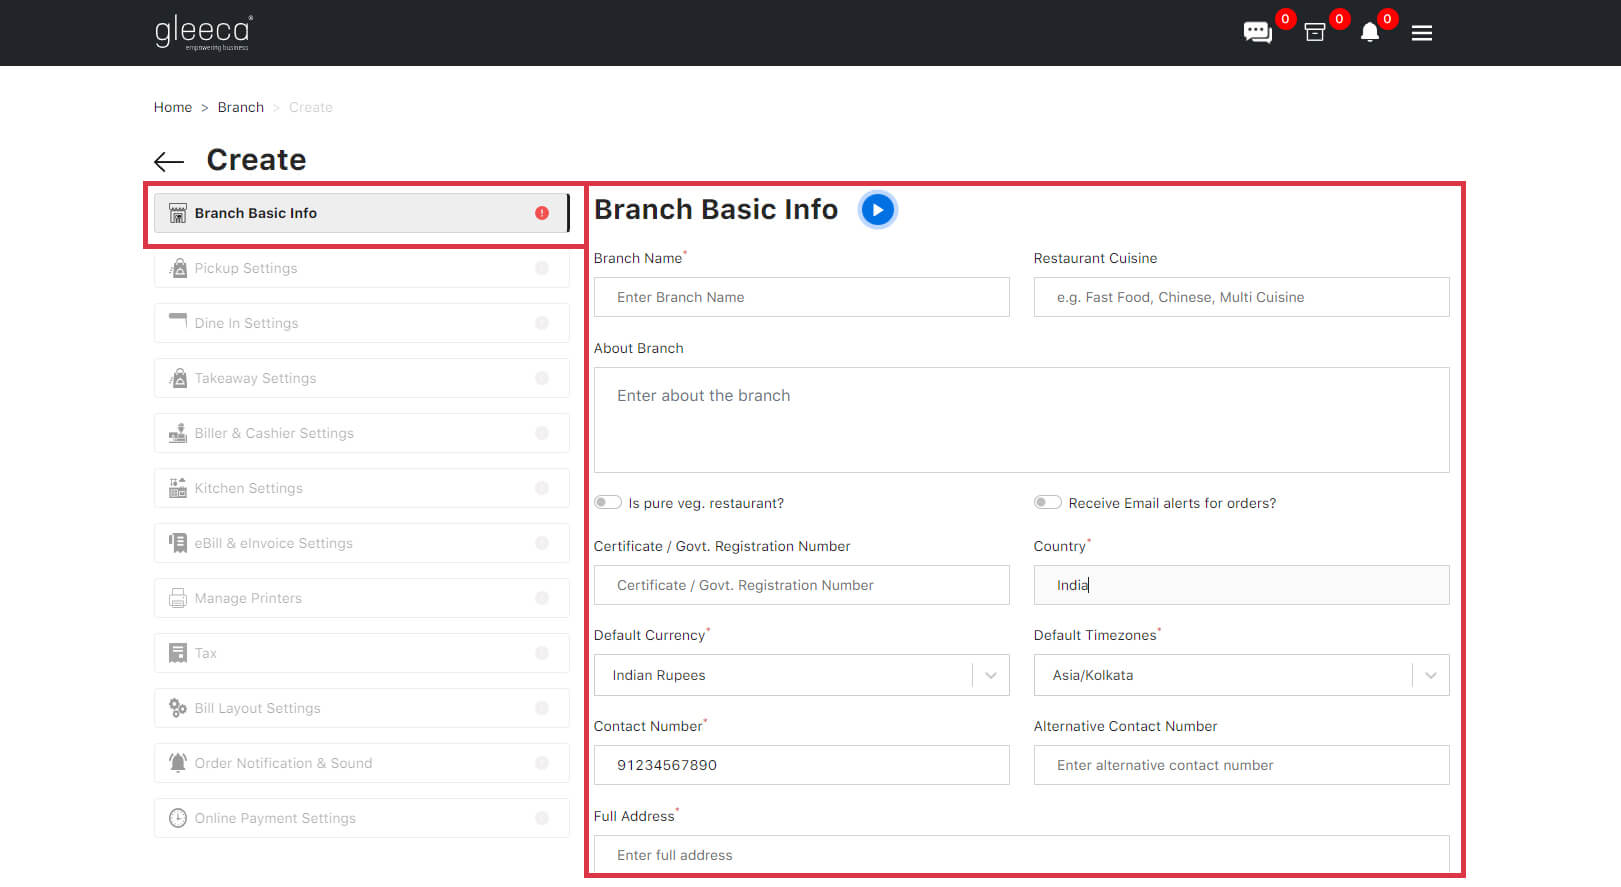
Now, it’s time to create your first branch. In Gleeca, as an owner, you can manage all your restaurant branches from one dashboard. Even if you have only one branch, you have to give all the branch details.
Under Branch Name Field, we suggest you give “Location Name” to identify your customers well, for example, Shastri Nagar, Rajender Nagar etc.
Other fields like Restaurant Cuisine, About Branch, Certificate / Govt. Registration Number, Alternative Contact Number, Landmark, Location URL and Restaurant Photos are optional. You can fill it in if you wish!
For more detailed explanation on Branch Basic Information, take a look at our short video tutorial. Click here to view
P.S. : In India, it is mandatory to reset your invoice number on the 1st of April every year. So before 31st March midnight the invoice format needs to be updated with the next year. For example – GR2022/001 should be changed to GR2023/01. You can modify the invoice number format annually to manage your billing formats and make them more user-friendly.
Step 2.2: Configuring Pickup Settings
The Pickup feature is very helpful if you want to handle more orders. The website that you get free with Gleeca can help you get recurring online orders when you enable the Pickup option. Your customers can enjoy the same delicious food of your restaurant but without occupying your restaurant table. Every customer can order the food of their choice from your restaurant menu, which will also be a part of your website, along with the price of every item. They can use the website link from any device, such as phone, laptop, desktop, tablet, etc. and that too without you getting involved in the process. Your work is to make sure that the order is prepared on time and kept ready for the customer to come and pick it up from your restaurant counter.
So, to enable pickup, you need to click the toggle button under Pickup Settings.

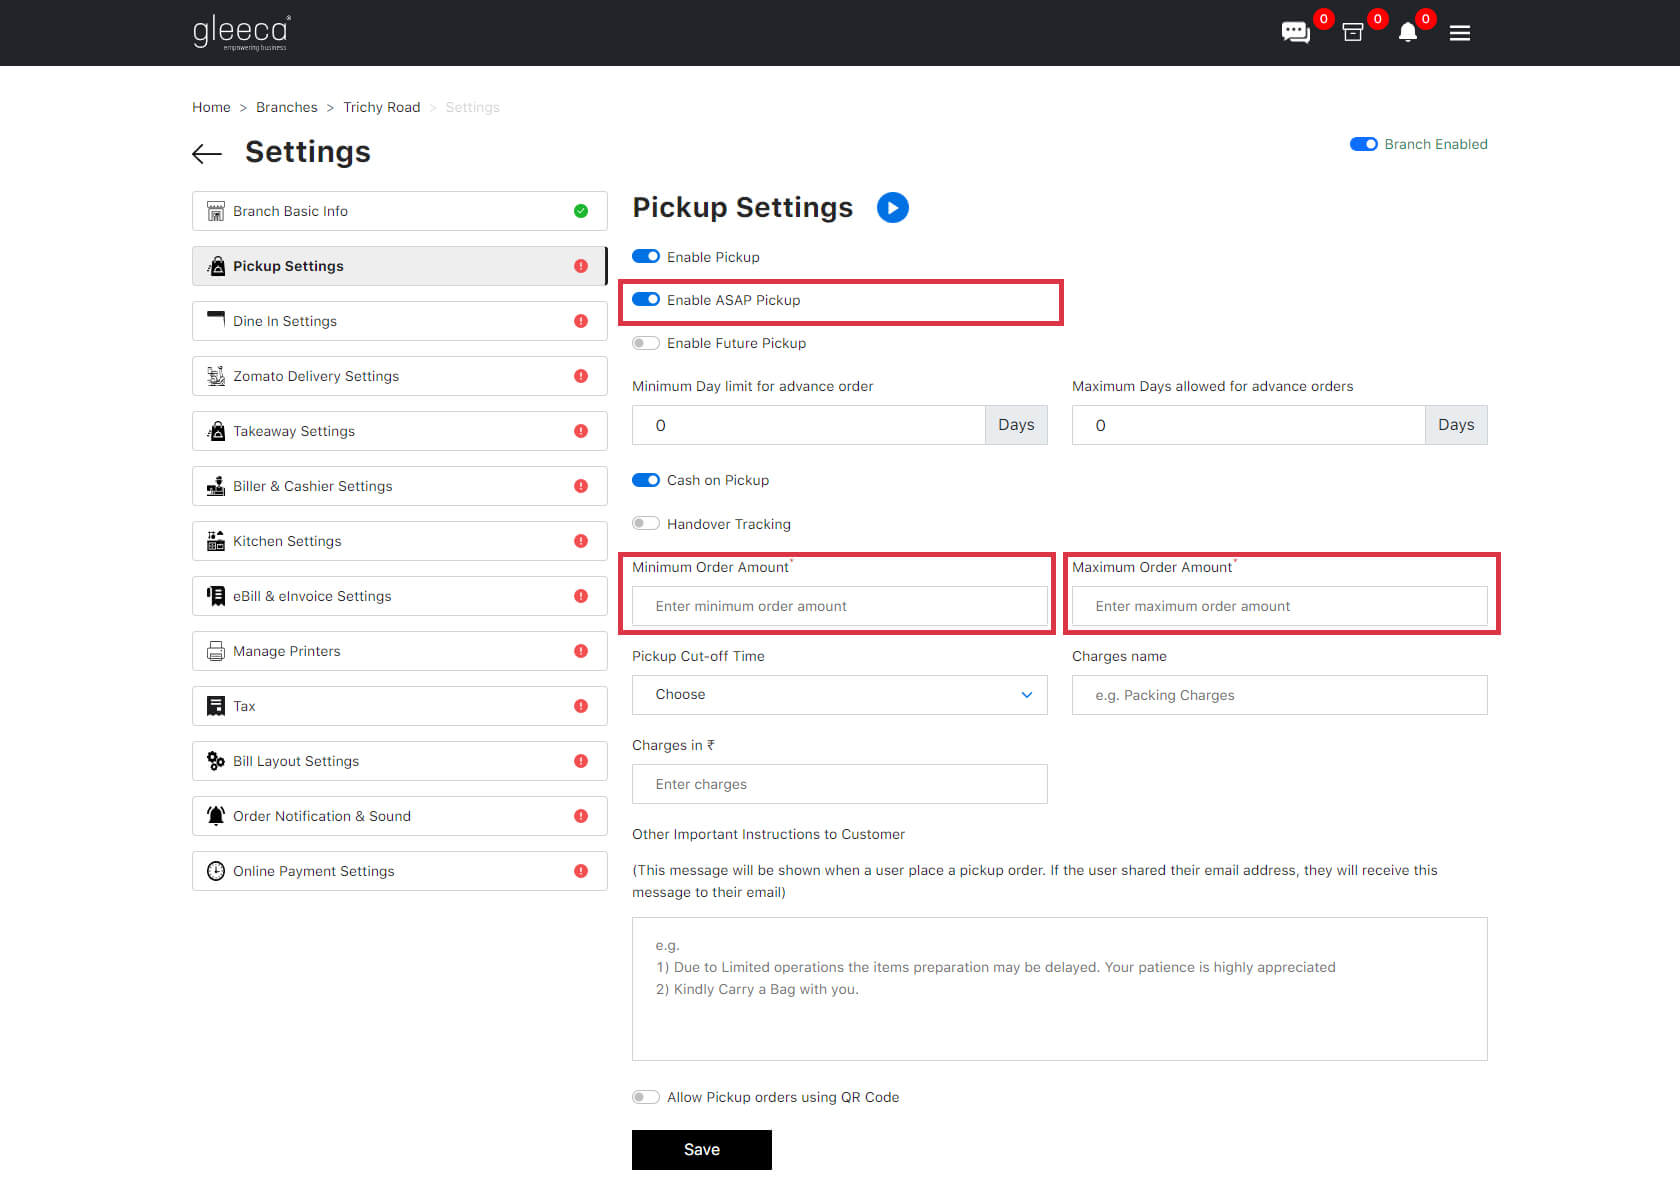
The ASAP (As soon as possible) Pickup & the Cash on Pickup payment method is enabled, by default. The first option means your customer orders and collects food as soon as possible (immediately/within a short period). Most of the restaurants prefer the ASAP Pickup.
Enable Future Pickup: If you would like to allow customers to order for a future date, you have to enable the future pickup toggle button. Restaurants that deal with food that have a longer shelf-life (example:bakery) could be benefitted with this option.
Minimum Day limit for advance order: If you enable “Future Pickup”, you can mention upto how many days earlier the order can be placed. For example, the customer wants an order to be delivered on the 9th of March, then as the owner of the restaurant, you can decide till how many days prior to that you will take the order. It could be any number of days as per your convenience. Hence, fill this field according to that. If you decide it can be 2 days then fill in ‘2’ and if one week, put ‘7’.
Cash on Pickup: You can accept pickup orders in Cash or Online Payment. By default, cash on pickup is enabled. You may later link your bank account under the payout setting from your main menu for online payments (See adding a bank account to receive online payments).
Handover Tracking: If you wish to track the handing over of pickup orders, you must enable “Handover Tracking”. When the order is handed over to the customer, the order will be marked as completed.
Minimum Order Amount: If you want to accept orders above some value, then you can mention them here. For example, if you mention as “200”, customers cannot order below Rs.200
Maximum Order Amount: If you mention “2000”, customers cannot order above Rs.2000
For detailed information on Pickup Settings watch our short video tutorial. Click here to view
Step 2.3: Configuring Dine-in Settings
We know Dine-in is an essential feature for every restaurateur. Hence we made its configuration very simple. You shall enable your Dine-in, and Online Table Reservation features using the Dine-in settings. Enabling Online Table Reservations will allow users to make bookings by mentioning the number of guests, date, and time.
Next, define your Dine-in business model. If you serve your customers with waiters, select the “Restaurant will serve” option or “Self Service”.
If you select the “Restaurant will serve” option, you will get table-based dine-in ordering, QR code-based digital ordering, and Dine-in POS features. Also, you shall decide whether your admin will take orders or the waiter will take orders from the table.
If you select the “Self Service” dine-in model, you will get Dine-in POS and QR Code-based Digital Ordering features.
For More Information, please read
- What is Gleeca Self Serving Dine-in?
- What is Gleeca Waiter-less Dine-in Management?
- What is Waiter-Based Dine-in Management?
- Enabling Online Table Reservation Feature
Step 2.4: Configuring Takeaway Settings
Let us digitalise your Takeaway Operations now. Go to your takeaway settings and enable it. Configure minimum order value, packing charge etc. If you need Takeaway Kiosk, enable “Allow Takeaway orders using QR Code.” This can help you automate your Takeaway billing and payment collection process.
For More Information, please read
Step 2.5: Configure Biller and Cashier Settings
Define your restaurant business model, like who will generate the bill and collect cash. If you have one person for both billing and payment collection, use Biller + Cashier. If you don’t want Gleeca to track your payment collection, then use Biller Only (Not recommended). If you have separate counters to generate bills and receive payment, then use Biller and cashier model.
For more information, visit What is Biller & Cashier Settings in Gleeca?
Step 2.6: Configuring Kitchen Settings
If you wish to send instructions to the kitchen from the waiter/admin and to map food items with multiple kitchens, then enable kitchen. If you’re using printers in your kitchens, then enable the Kitchen Printer option.

Step 2.7: eBill and eInvoicing Settings
If you want to offer an excellent experience to customers with true digitalisation of your restaurant, then enable eBill and eInvoicing settings. You will have complete control over multiple actions like generating bills, recording payments and handover of orders, etc., for all available order types. For more information, visit What is Gleeca eBill Add-on?
Step 2.8: Configure your Printers (If you have printers on kitchen stations)
You can add & manage multiple printers using our Desktop based software. Download the desktop software and follow the Installation Guide section from your printer settings.
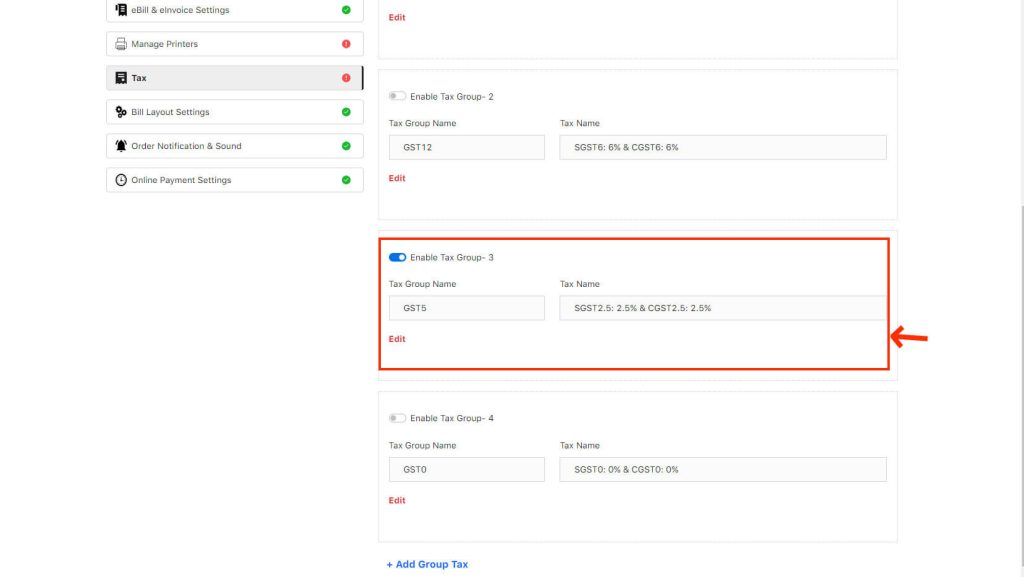
Step 2.9: Define your Taxes as per the Government Regulations
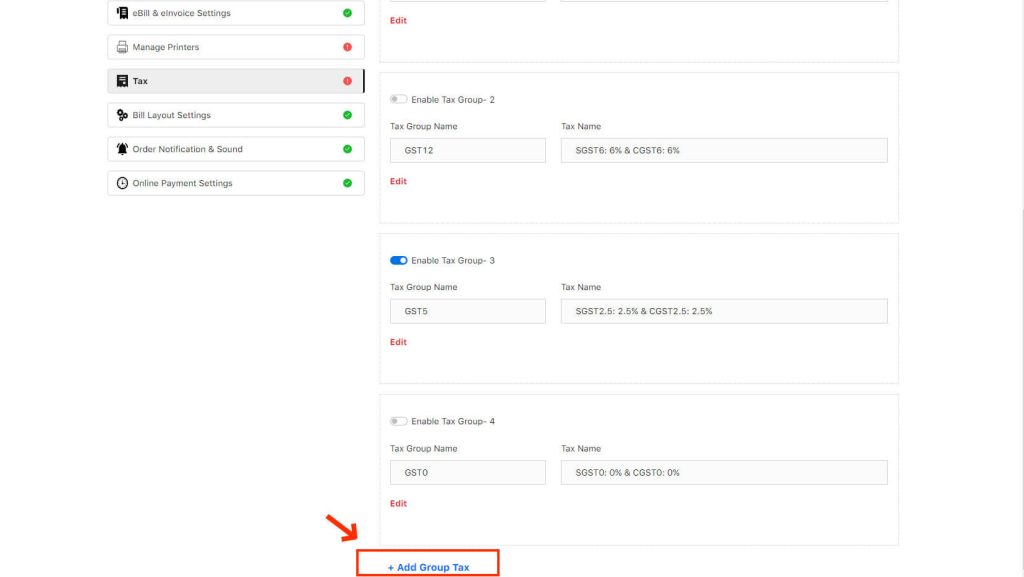
By default, the tax has been disabled. In case your restaurant is not eligible to collect you can retain the settings as disabled. If you want to collect tax you have to enable it.
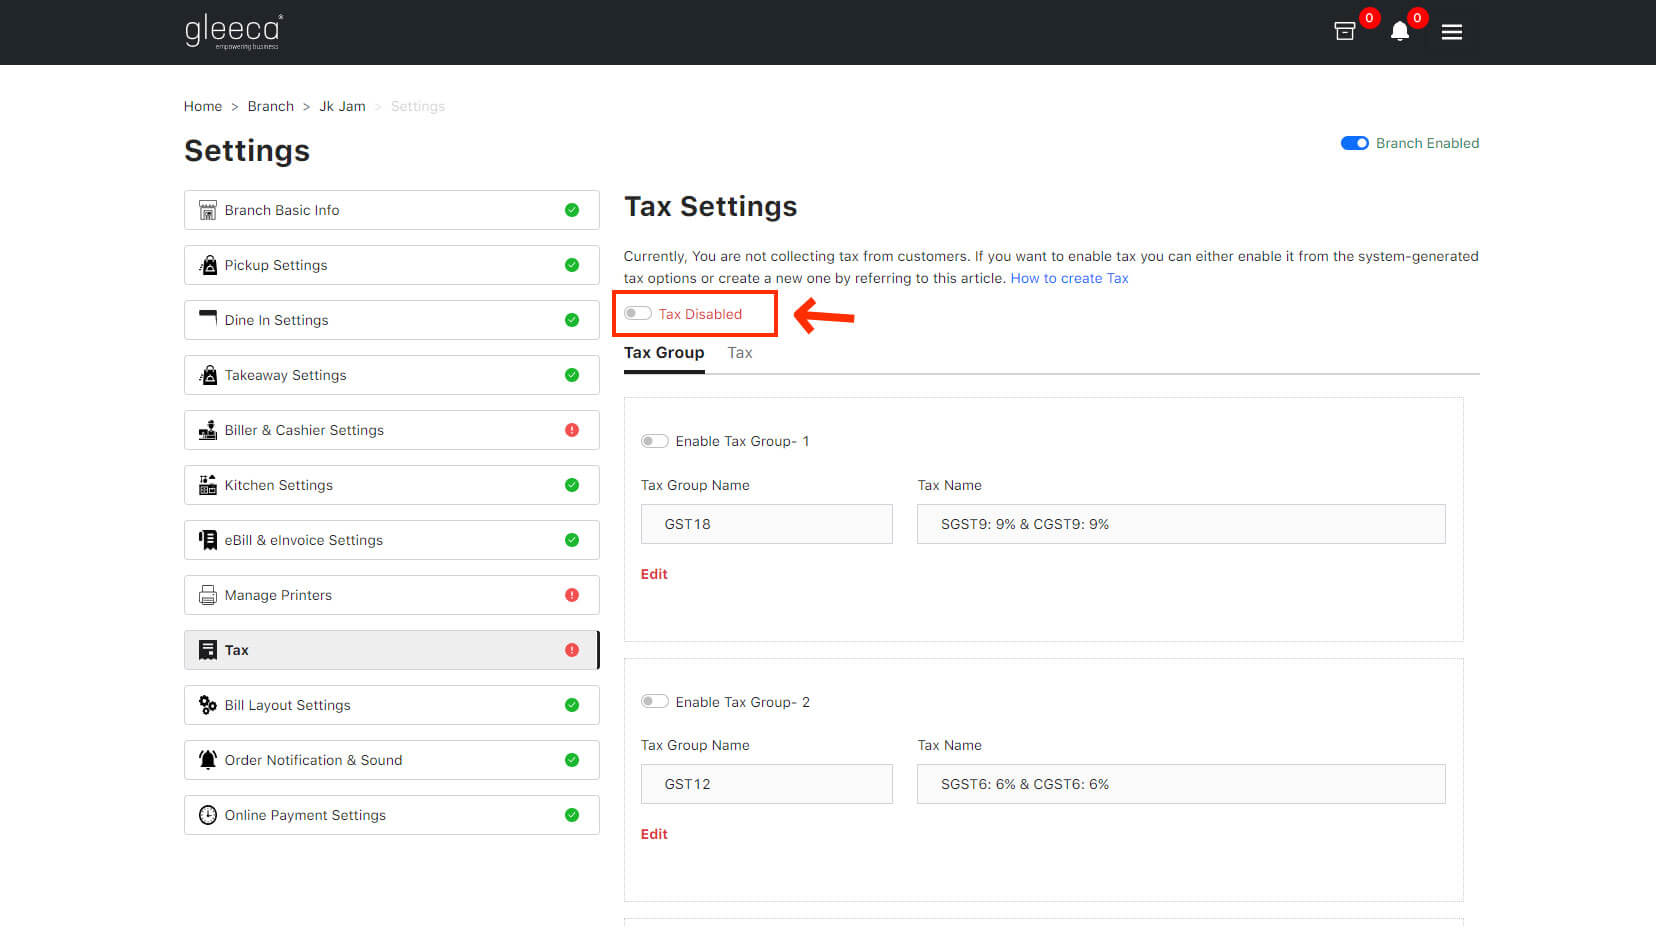
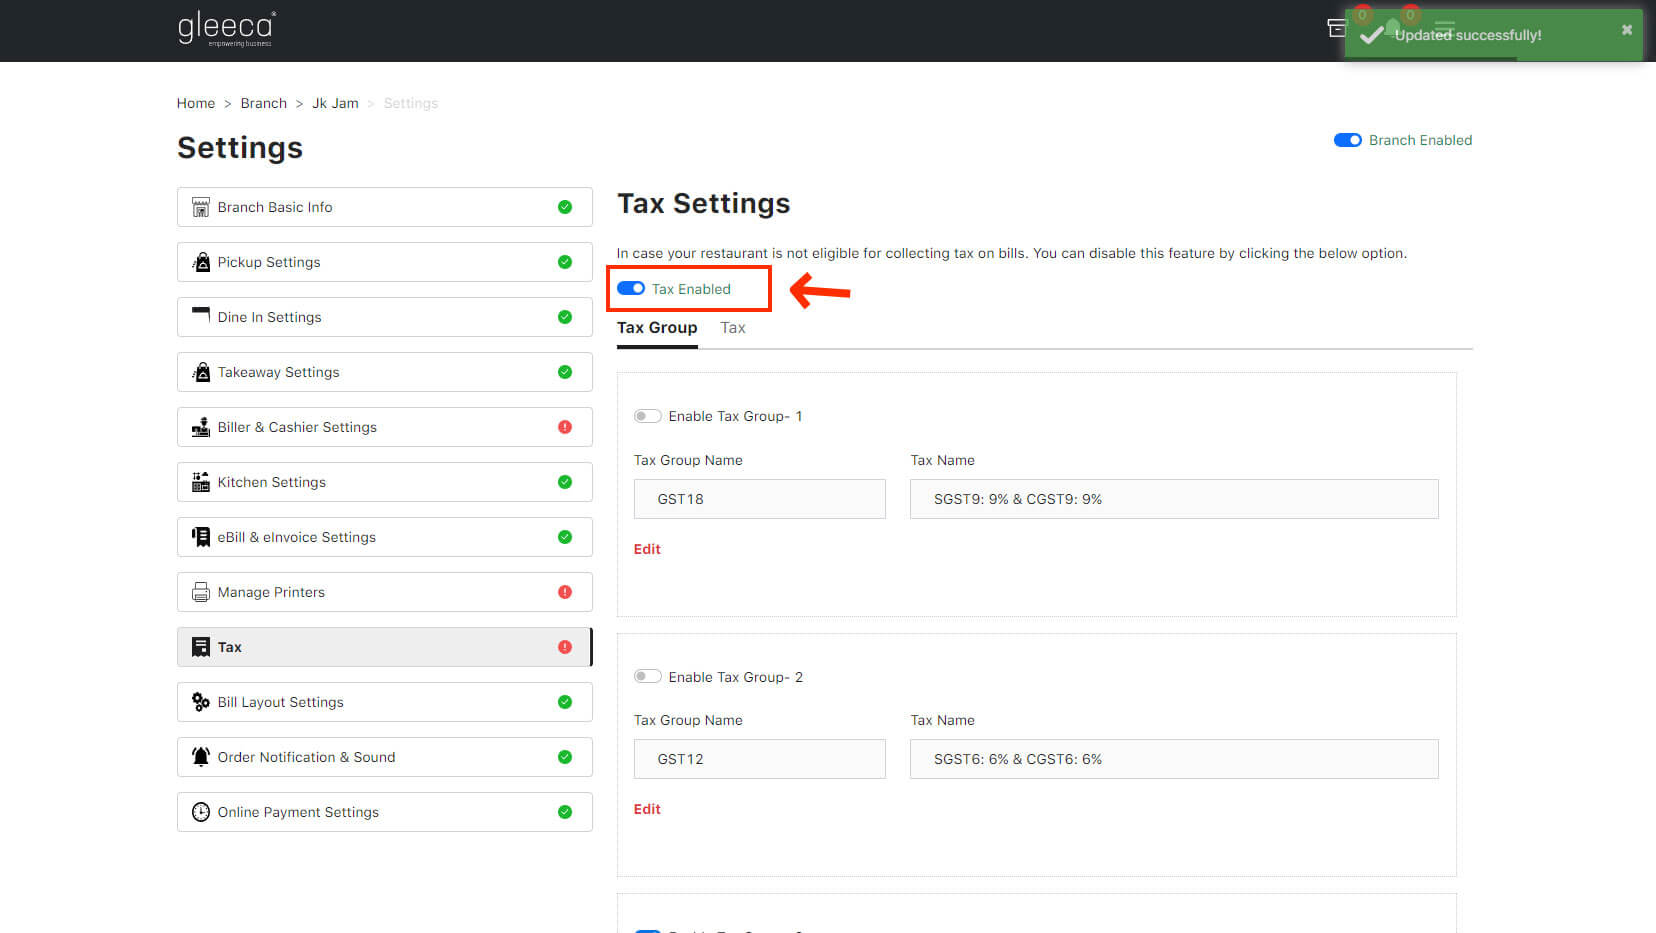
By default GST 5% has been enabled. If you want to enable more than one tax you can enable the respective taxes or need to create a new tax you can create and group it. Refer the below screenshots.
Step 2.10: Configure your Bill Layout
You shall decide what content should appear on your bills. You can add your restaurant name, branch name, address, GST, FSSAI or license number, CIN Number, Branch Phone Number, Notes to the customer and QR code.
Super Tip: You shall add your Gleeca Subdomain in your bill notes as people could place online orders if they know your subdomain.
Step 3: Configuring Menu/Restaurant Timing
Go to the Manage Menu Timing option from your branch menu and classify menu timing using the Menu Classification option. After finishing how you are classifying your menu, add timing for each menu classification using the manage menu timing tab. For more information about customising your restaurant timing, please visit How to configure the menu using Gleeca?
Step 4: Adding Menu Categories
Once menu classification and menu timing is configured, you need to add menu categories. Menu categories will help user to filter menus based on the nature of food items. For example, starters, beverages, main course, gravies, bread etc., are your menu categories. You shall add a menu category as per your idea. For more information about adding menu categories, please visit How to configure the menu using Gleeca?
Step 5: Creating Kitchen Stations
This is the last step before you can start adding your menu. You can skip this process if you don’t wish to automate your restaurant operations (Not Recommended). By default, all items are added to “Main Station”. To create additional kitchen stations, please visit How to add Kitchen Stations in Gleeca?
Step 6: Adding Food Items to your Menu
The exciting part of onboarding Gleeca is adding your food items to the menu which you configured earlier. Go to the Items option from your branch menu and add your food items. Please visit How to create a Food Item using Gleeca?
Step 6.1: Creating Variants
While adding your food item, if you want to offer different sizes/variants of an item, then you need to add variants separately. How to create a variant for a food item using Gleeca?
Step 6.2: Creating Add-ons
While adding your food item, if you want to add customisation options like toppings, flavours etc., you need to add add-ons. In Gleeca, you can add add-ons with a single option selection and multiple option selection. So you need to create add-on categories and then create add-ons. While adding a food item, your should map it with as many item categories as required. For more information, visit What are add-ons and add-on categories in Menu Item?
Also, visit How to customise my Food Items using Gleeca? to learn about how to use both variants and add-ons while adding a food item.
Step 7: Configuring Tables and Halls
You shall configure the name of the halls you have in your restaurant branch (For example, Main Hall, Family Room, VIP Room etc.) and map tables to each hall. Also, you shall map your waiters to the table. For more information, visit how to add Hall Locations and configure Tables in my restaurant and map the waiter to a table.
Step 8: Create your Staffs on Gleeca
You shall create your staff accounts such as Restaurant Admin, Waiter/Captain, Biller, Cashier, Biller + Cashier (Single Window Operator), Kitchen Admin (Coming soon) and Own Delivery Valet (Coming soon). The staff creation process is identical for all roles. Please click here to learn how to create a waiter. Instead of selecting the waiter role from the dropdown area, you have to choose the role you wish to make.

By default, the user name will be generated, and you need to set the password for your staff by enabling login credentials to login into your Gleeca Account.
Step 9: Configuring Discount Coupons
It is essential to run promotions and display offers inside your restaurant so your customers can see and avail it using Online Pickup or Takeaway Kiosk or QR code Dine-in. Offers will make them try more food items, indirectly developing a sense of brand loyalty. Also, they tend to give their personal information to avail discounts and using that, you can plan promotions in future. To create discount coupons, visit How to configure Discount Coupons for your customers?
Hope you had a smooth onboarding experience with Gleeca. If you’ve faced any difficulties, please go to your main menu from your dashboard and click “Support Ticket“. Our Support team will address your queries promptly and assist you in using Gleeca to improve your business.
